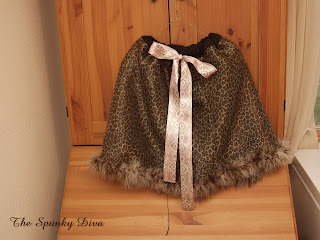
{This post was originally a guest post for Sugar Bee}
The idea for this tutu came after I found the leopard print chiffon at Hobby Lobby. I had been wanting to use a feather boa as trim on a tutu for a while, and I felt that this fuzzy boa looked sturdier (plus it was cheaper) than the more extravagant feather boas available.
Ingredients for Furry/Fuzzy Trim Tutu:
1 yard of chiffon or novelty fabric (tulle would be to "thin" to use for this project)
1 yard plus of coordinating 1.5" ribbon
2 yards of Fur trim (found with the Feather Boas)
Fabric to make ribbon casing (1 yard by 4", this fabric can be pieced together if needed for length)
First: Take your main fabric, unfold it, and match the selvage edges together right sides together (if you have questions about right versus wrong sides of fabric see description in the next step). Sew with a zig-zag stitch through the selvage making sure to use reinforcing stitches at the start and end of your stitching. I have my zig-zag set to 5.0 width by 2.5 length, which worked very well for this project.
Next: Take your fabric and fold it in half matching up the raw edges. This creates the "skirt" of the tutu. Make sure that you fabric has the right side out as you will not be turning this project.
Normally fabric has a right and wrong side. The wrong side will be a paler version of the print on the right side. Some fabrics it is harder to tell than others. This printed chiffon didn't have a "paler" side per say, but did have a shiny and dull side. So, I made sure to have the shiny side on the outside for this next step.
You will use your zig-zag again to stitch the two raw edges together. Then use pinking shears (which dramatically cuts down fabric fraying) to trim your fabric about 1/4" from the zig-zag stitches.
Measure along the edge you just trimmed to get the length you will need to make your ribbon casing. Cut your ribbon casing fabric the length you just measured plus 1" by 4" wide (you can cut it 3.5" wide, but I prefer to cut wider and then trim the fabric after ironing). Fold each end over twice, iron and stitch closed to create a finished end. Folding each end should take up about a 1/2" of fabric. If it takes up a little more than a 1/2" that is okay. This encloses the raw edge to prevent fraying, and is a great trick to use on lots of different sewing projects.
Iron your fabric in half lengthwise. Use starch to create a stiffer, crisper fold. Also, stiffening the fabric with starch will also make the fabric easier to sew.
Now, take your ribbon and lay it out the length of your casing. Cut the ribbon 4" longer than the ribbon casing, and trim your casing down for width. You want to leave the casing at least 1/2" wider than the width of the ribbon.
Pin the top edge of your skirt/tutu (the edge that you trimmed with the pinking shears) and the ribbon casing together. Center the ends of your ribbon casing in the front of the skirt/tutu. The ends should met end to end, but not overlap. Use a straight stitch to sew the two together. Then use your iron (on the setting that won't melt your skirt/tutu material) to smooth out the seam.
To create a more finished inner seam, stitch 1/8" along the seam catching the raw edge of the skirt/tutu.
The top arrow shows the "uncaught raw edge", and the bottom arrow shows how catching the raw edge will make for a more "finished" edge.
Now set your zig zag to 5.0 width and 0.0 length, or use your button attaching stitch to attach the fuzzy trim! Start attaching your trim at the back where the seam in the skirt fabric is. I wanted to include this fuzzy picture to show how I used my fingers to separate the fur before stitching the bar tack (stitches with no length to attach something). To make sure the trim was sturdily attached I anchored it every 4 inches, about 1/2" from the folded edge at the bottom of the skirt/tutu. When I reached the beginning of the fur trim, I cut the end so that there was a little overlap, and did two bar tacks about 1 inch apart to make sure the end was secure.
Thread your ribbon through the casing, stitch it in the center of the back with a straight stitch to prevent little hands from pulling the ribbon out, and you are done!
If you would like to see how to make the Zippy Flower Tutu, you can check it out at The Spunky Diva!
Many thanks again Mandy for having me over!
~Kimberlee


Comments
Post a Comment
Thank you for taking the time to read this post. I love reading your comments, and enjoy returning the favor {even if it takes me a while to return it, LOL!}.